 Learn
by video - Rules-based Calendaring
Learn
by video - Rules-based CalendaringCalendar > Rules-based Calendaring
Calendaring court rules can be very complex as the practice of law requires compliance with various deadlines, some are court ordered, while others are statutory. By leveraging the power of Abacus Court Rules (ACR) to apply court rules and deadlines for due dates on your client files. Abacus Court Rules are updated automatically to account for all rule changes dictated by the courts. This allows you to rest assured that you won't miss a statutory or court mandated deadline.
● Enabling the Abacus Court Rules (ACR) capability
● Viewing your Court Rule Events
 Learn
by video - Rules-based Calendaring
Your Firm Administrator can begin the setup at any time.
If you try to create a Court Rule Event before the Abacus Court Rules (ACR) capability has been enabled for your firm, a prompt displays:
1. Click New > Court Rule Events.
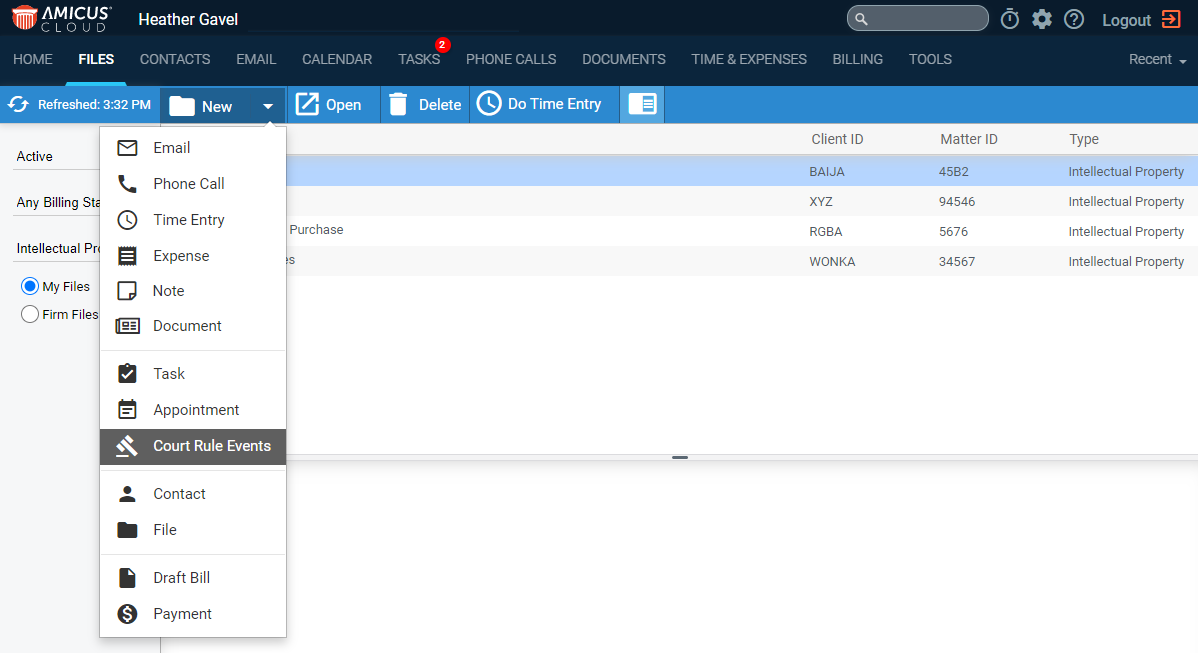
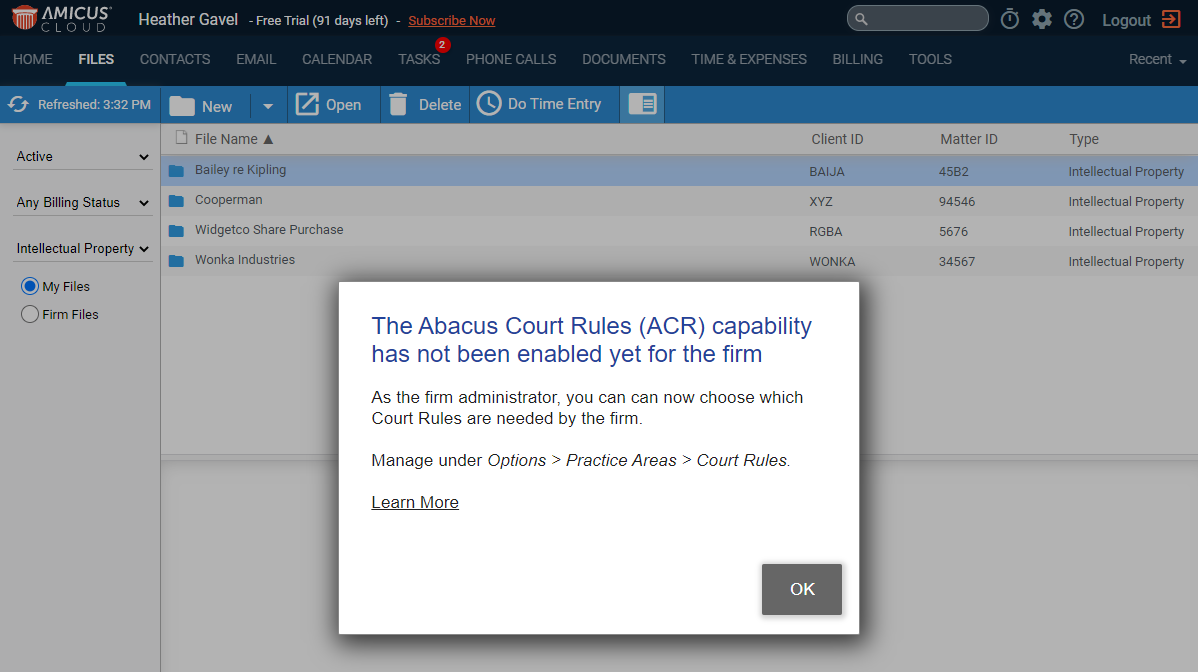
2. A prompt displays
notifying you that the Abacus Court Rules (ACR)
capability has not been enabled yet for the firm.
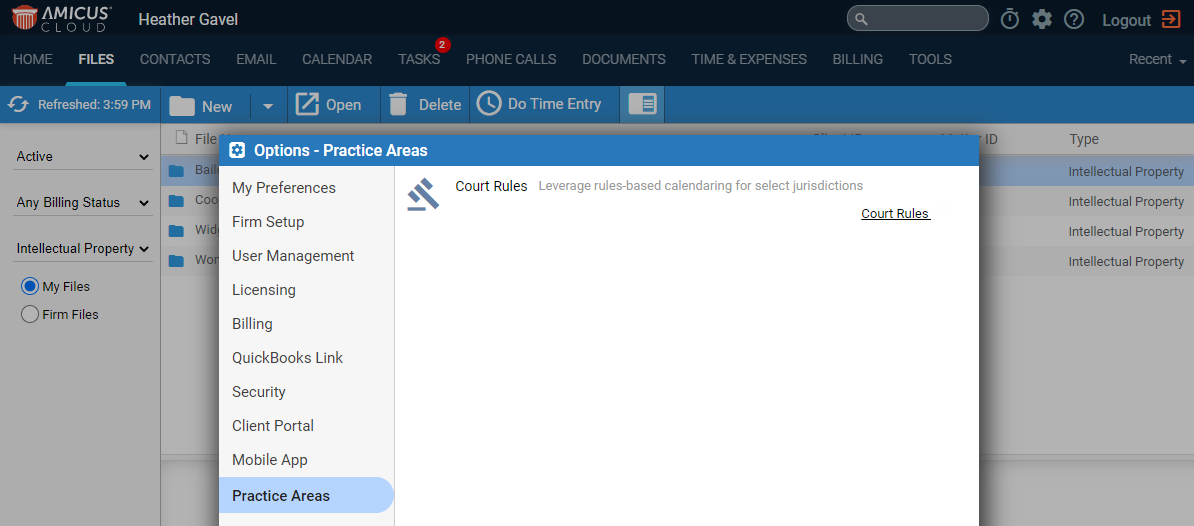
3. If you are
the firm Administrator you can now choose which Court
Rules are applicable for your practice by selecting Options
> Practice Areas > Court Rules or clicking
OK to go directly to the Court Rule Settings
window.

4. Click Add from the taskbar to display the Add
Court Rules window and select the Court Rule
Sets that are applicable to your firm. After you select a Rule Set, you may receive a prompt identifying
related rules and recommending others that should be run in conjunction
based on your selection. For example, Country
Rules will prompt you to also add State Rules.
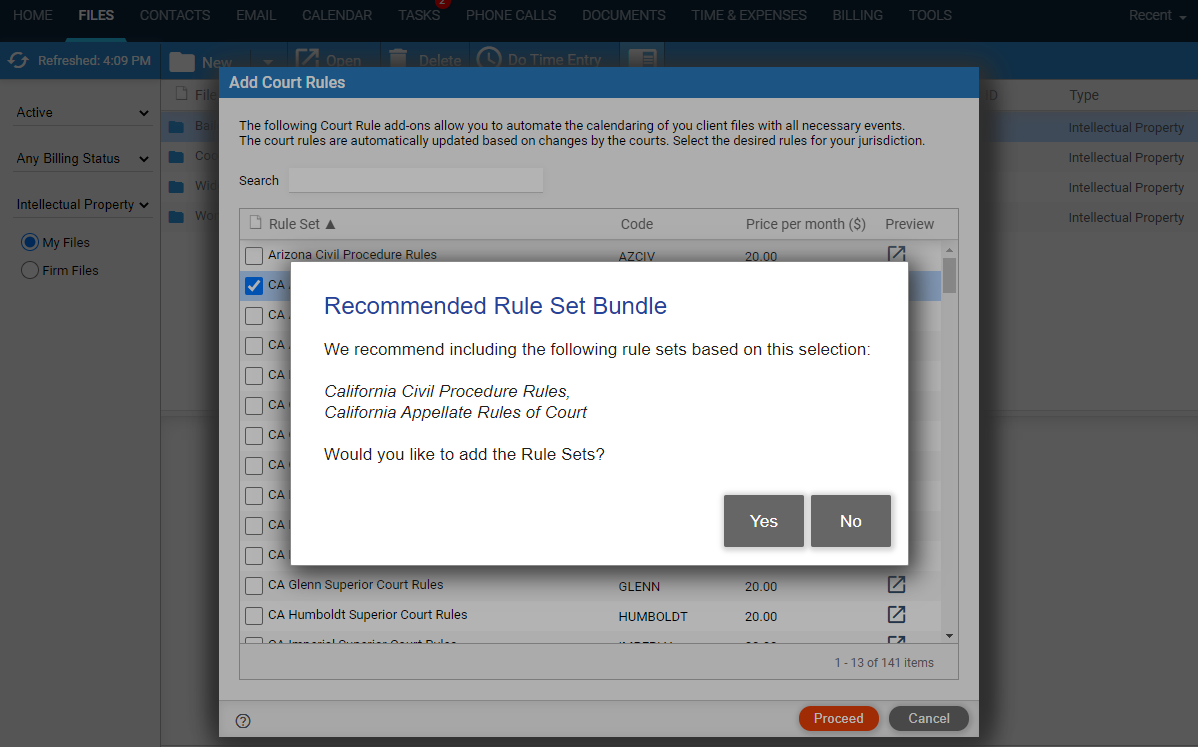
5. Click Yes if you would like to include the Recommended Rule Sets or click No to ignore the recommendation. It is ultimately up to you to decide which rule sets to purchase.
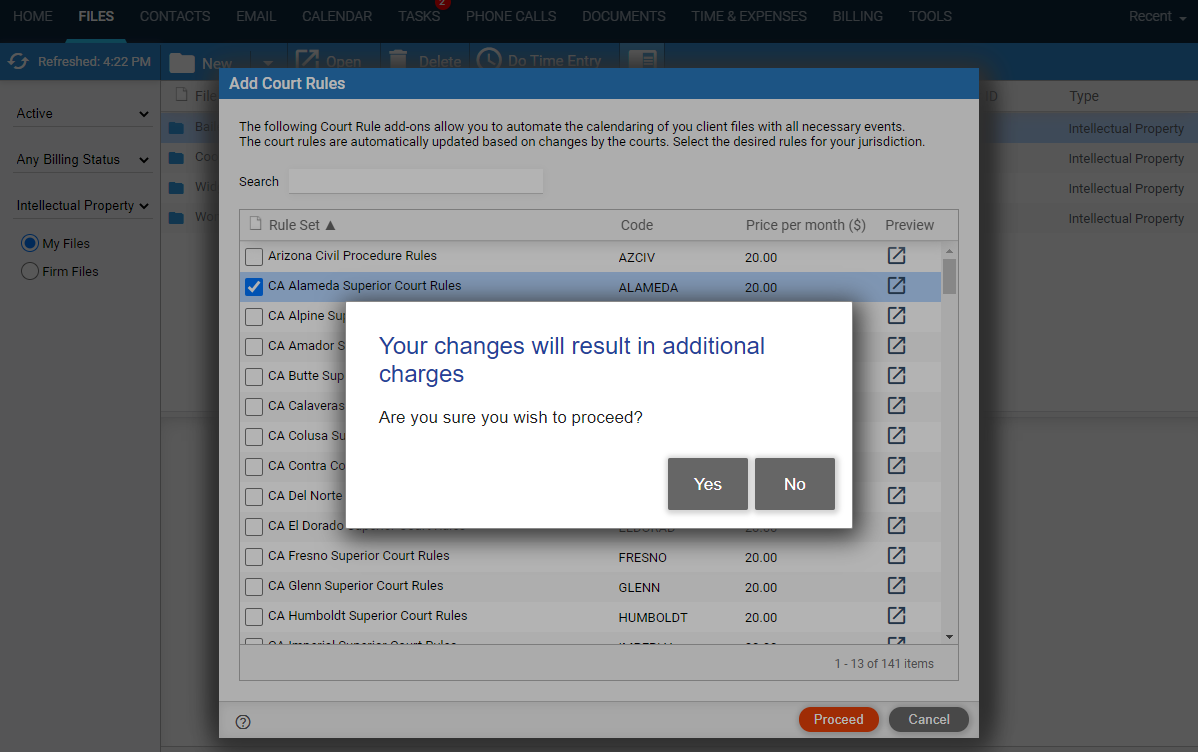
6. Click Proceed to add the selected Rule Set(s). A prompt
displays informing you that your changes will result in additional charges.
Click Yes to proceed or No
to cancel.
7. The selected
Court Rule Settings are added to your firm.
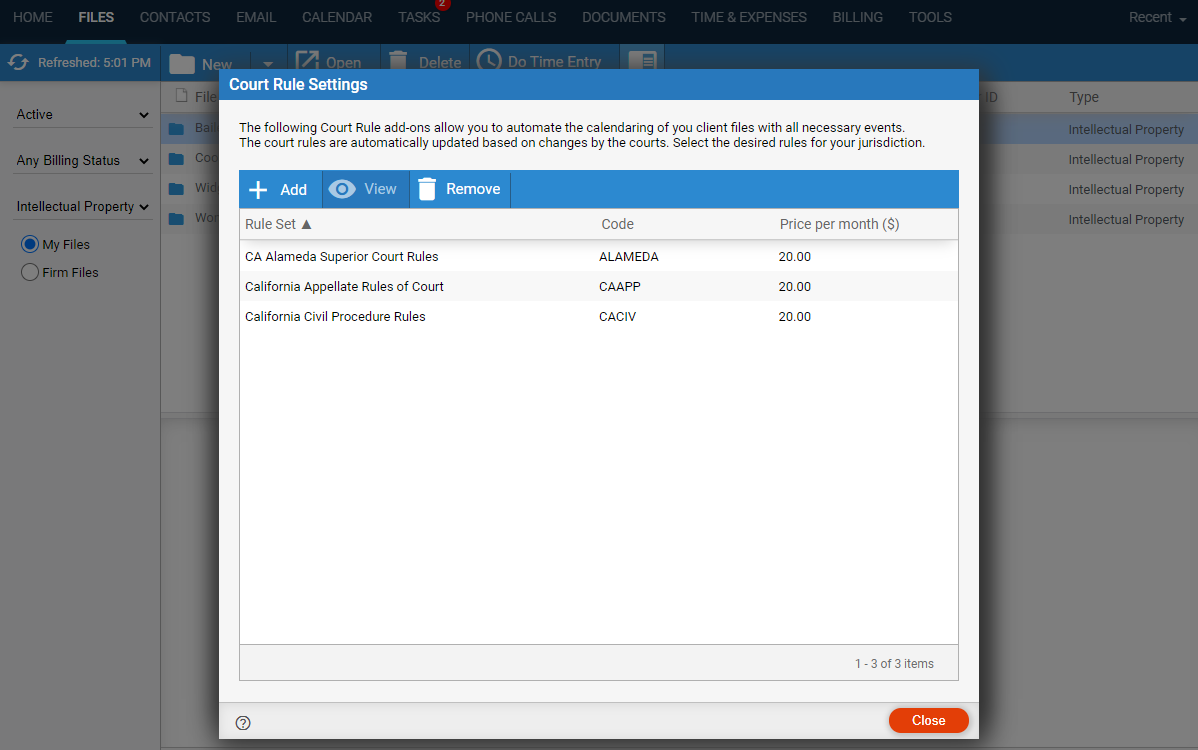
8. Click Close to begin using the Court Rule Settings added to your firm.
Our self-serve subscriptions allow firms to buy Rules Sets at any time within Amicus Cloud. Rule Sets are added to existing subscriptions and are fully functional in free trials. The firm Administrator chooses to add the rules that are applicable for their practice, allowing other firm members to quickly procure and access the rule sets on demand.
The Court Rule capability is priced on a per Rule Set basis. This is added to your monthly or annual subscription, and you can add or remove a Rule Set at any time.
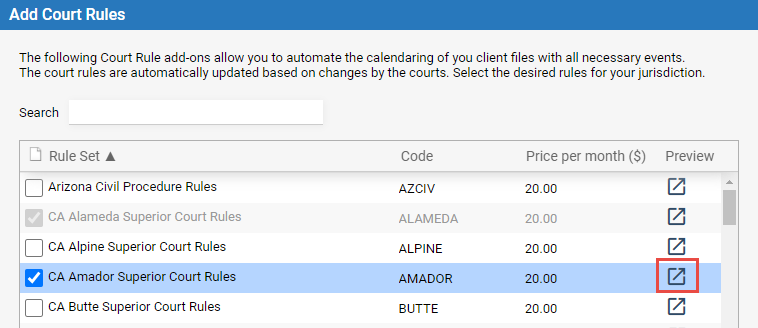
1. To preview
the contents of a Rule Set as you are deciding
which ones to add for your practice, click the button under the Preview column to show all rules that are contained
in the set.
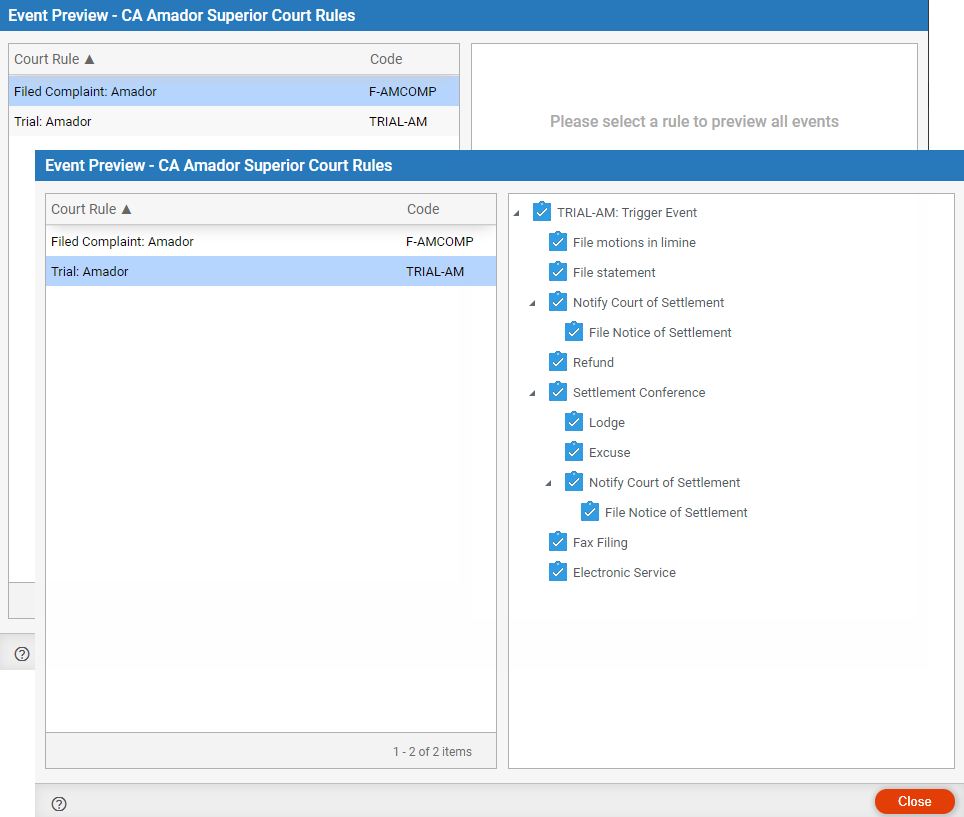
2. Selecting
a specific rule shows all the possible events.
Our rule sets are supported for many jurisdictions across the United States, and we are always on the lookout to add new rule sets based on the needs of our customers.
You can create appointments and tasks from a rule after the Abacus Court Rules (ACR) capability has been enabled for your firm by clicking New > Court Rule Events from anywhere within Amicus Cloud. The Court Rule Events option displays prominently when accessed from within the Calendar and Tasks modules. When used directly from a Client File, the details are auto- populated in the wizard that follows.
To create events from a rule:
1. Click New > Court Rule Events from anywhere within
Amicus Cloud to initiate the event creation with an easy to follow wizard.

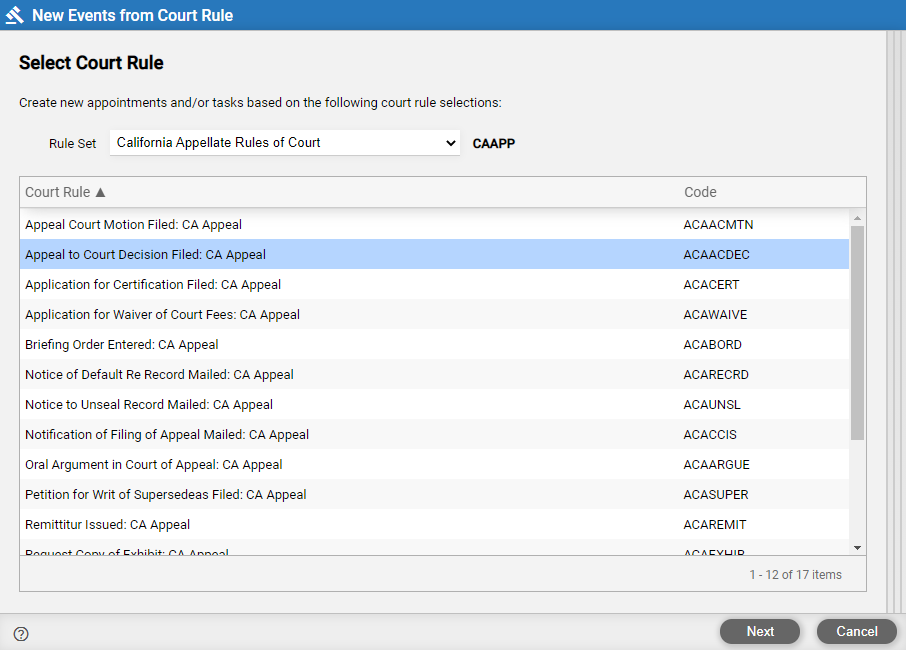
2. The New Events from Court Rule window displays.

3. Select a
Rule Set from the drop down list of all the
rules the firm has subscribed to in the Rule Set
field and the desired rule, then click Next.
4. Set important
Options in the next page of the wizard.
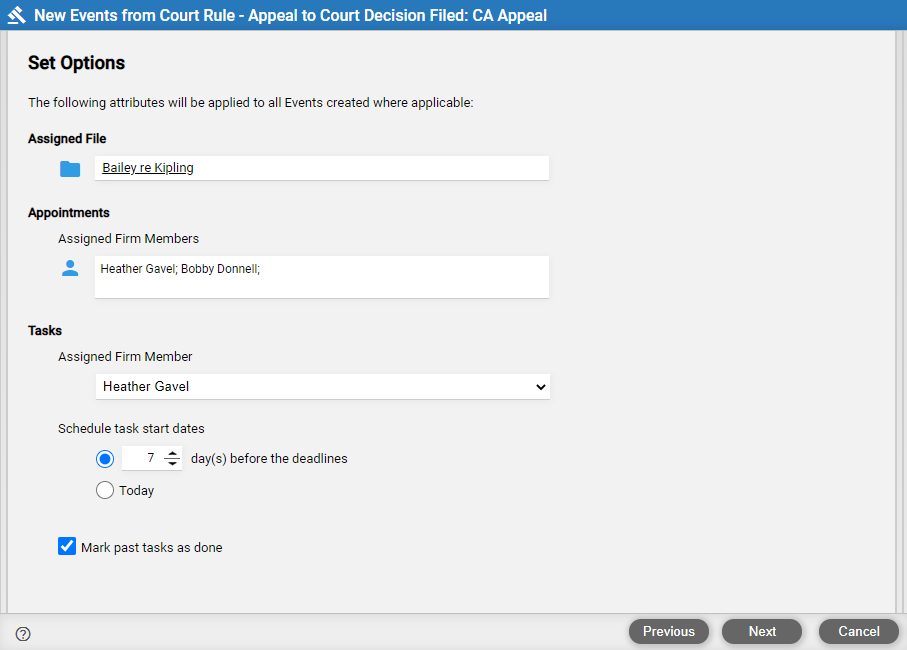
5. Complete the following fields:
● Assigned File – Enter a file name, or click the file icon to display the Select File window and select a file, then click Save & Close. If the New Events from Court Rule wizard is initiated from a client file, this information is auto populated.
● Appointments – The responsible lawyer on the selected file is automatically listed as the Assigned Firm Members for appointments that will be created. Click the person icon to display the Select Firm Members / Groups window. Select other firm members and/or de-select the default firm member if you wish. Click OK to return to the wizard.
● Tasks – The responsible lawyer on the selected file is automatically listed as the Assigned Firm Member for tasks that will be created.
● Schedule tasks start dates – The Due Date or Deadline is defined by the court rule. By default, the start day in Amicus Cloud for any tasks in the rule will be 7 calendar day(s) before the deadlines. To change the day(s) before the deadline select the first radio button and select an alternate value using the spinner controls or select the Today radio button.
● Mark past tasks as done – Click this check box if the trigger date you specified could result in some events being created that should have already been completed by Today. The check box will automatically mark any of these past events as DONE so they won't clutter the Task list.
6. Click Next to display the Set Trigger
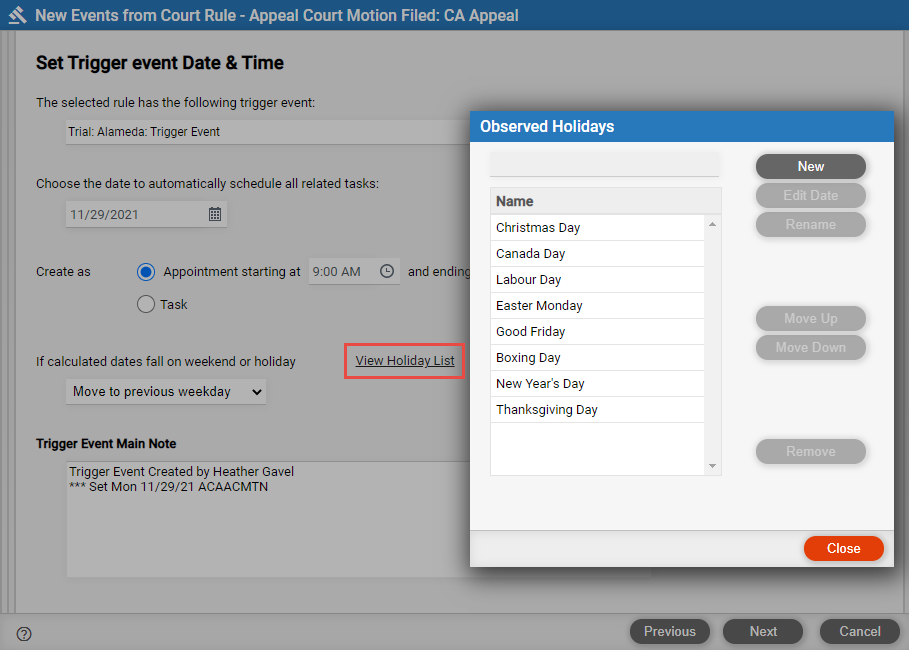
event Date & Time screen.
Complete the following fields:
 |
Important: This is the most important step in the wizard. The Trigger Event is the one known date that everything else is scheduled around. |
● The selected rule has the following trigger event – This is auto populated with the selected rule.
● Choose the date to automatically schedule all related tasks – Use the calendar controls to select a date.
● Create as – Select either the Appointment starting at or Task radio button. Click the clock icon and select a time from the drop down menu if Appointment starting at was selected or leave the defaults.
● If calculated dates fall on weekend or holiday – Amicus Cloud automatically adjusts events that would otherwise fall on a weekend or holiday. Select an option from the drop down menu. The default is Move to previous weekday to allow additional time rather than potentially being late for something. Of course, you can have it Scheduled Anyway, or Move to next weekday.
● Click View Holiday List to see the list of holidays included in the calculations. Adjust the event as necessary or click New to add a new observed holiday to the list. All impacted related events are updated.
● Trigger Event Main Note – The Responsible Lawyer and Date the Trigger Event was created displays here. Click in the textbox to enter additional text or edit the existing text. This will appear on the Trigger Events note body and be visible when viewed outside of Amicus Cloud, for example on a phone or in Outlook.
7. Click Next to Preview Results.
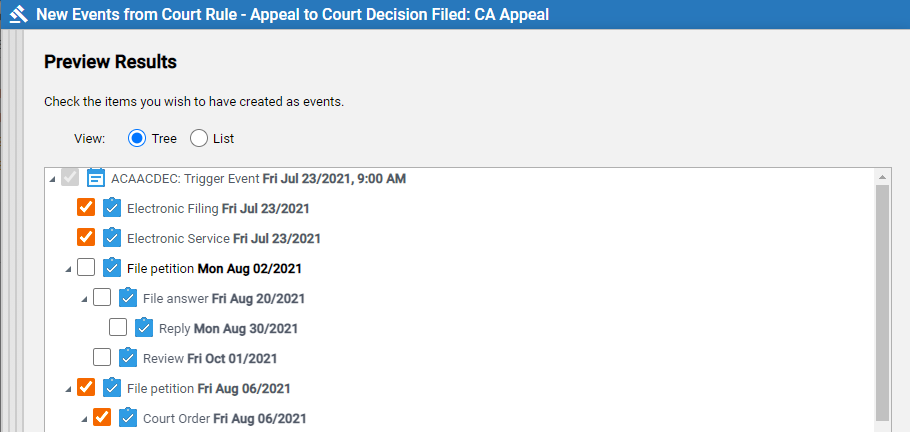
This screen allows you to view the events that will be created as part
of the selected rule. Setting the Date and
optionally Time in the previous screen for
the Trigger Event automatically scheduled
all the related events that are displayed in this screen.

● You can edit
the list by clicking the orange check mark
to deselect events in the list. Dependent Events
can also be adjusted accordingly. Attempting to deselect a parent event
will uncheck their dependent(s).
8. Toggle between
the Tree and List View by selecting the corresponding radio button
to see additional information. Moving your mouse over an item in the list
displays a tooltip showing the Task Details.
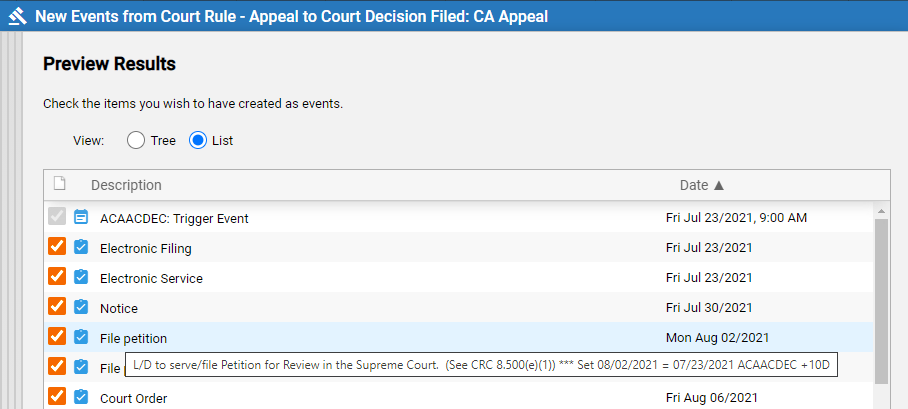
9. When you are satisfied with the events in the list, click Create to create the Court Rule Events and add them to the firm Calendar/Task list.
10. The creation of the Appointments and Tasks may take a minute or two depending on the number of items to be created.
● A prompt displays
informing you of how many Appointments and
Tasks will appear in the
Calendar/Tasks list. Click OK.
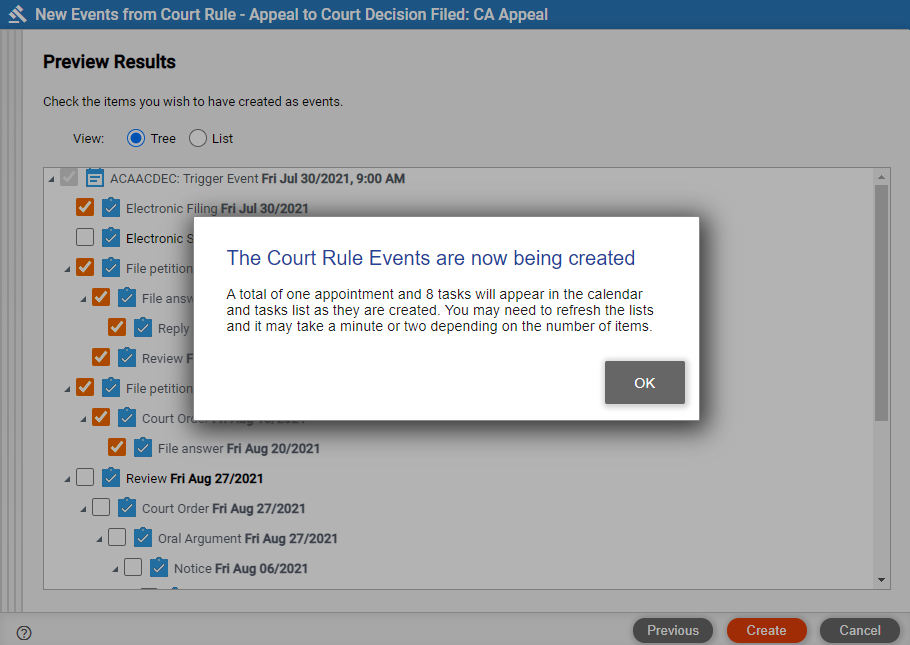
It may be necessary to refresh your Calendar/Tasks list to see all of the items as they are being created.
To view Court Rule Events Tasks and Appointments created from an Abacus Court Rules (ACR):
1. Select Tasks from the main menu bar to see a Tasks
list.

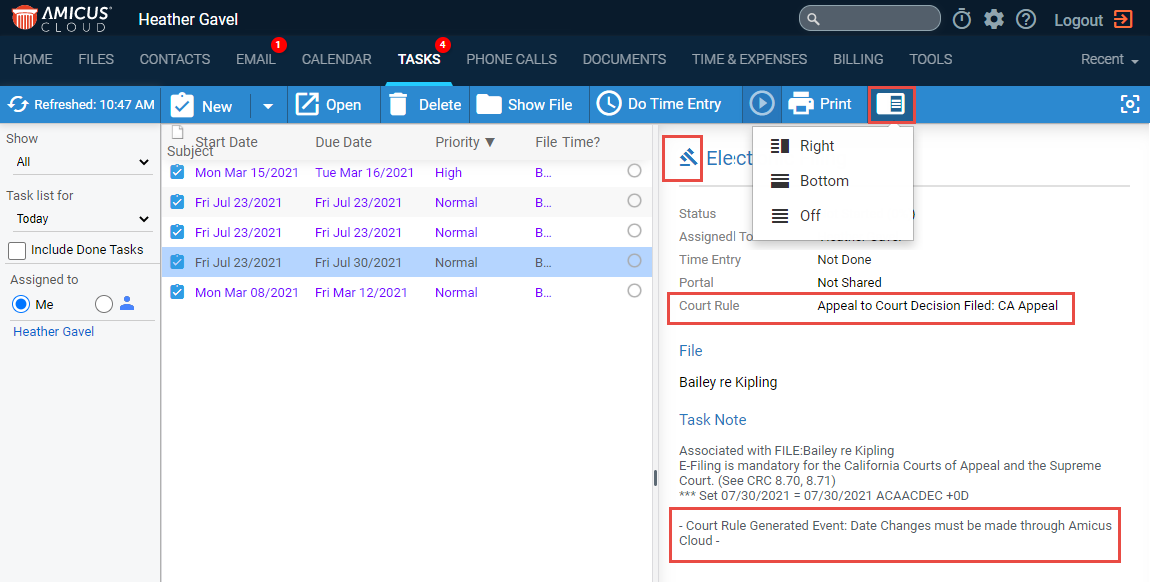
2. To preview
the contents of the task select an item in the list, click the
Preview button and select an option from the drop down list. The
Court Rule ![]() icon displays
in the heading and the name of the Court Rule
is listed in the Information section. - Court Rule Generated Event: Date Changes must be
made through Amicus Cloud - displays under Task
Note.
icon displays
in the heading and the name of the Court Rule
is listed in the Information section. - Court Rule Generated Event: Date Changes must be
made through Amicus Cloud - displays under Task
Note.
● Or, select Calendar from the main menu bar to see a Calendar view.
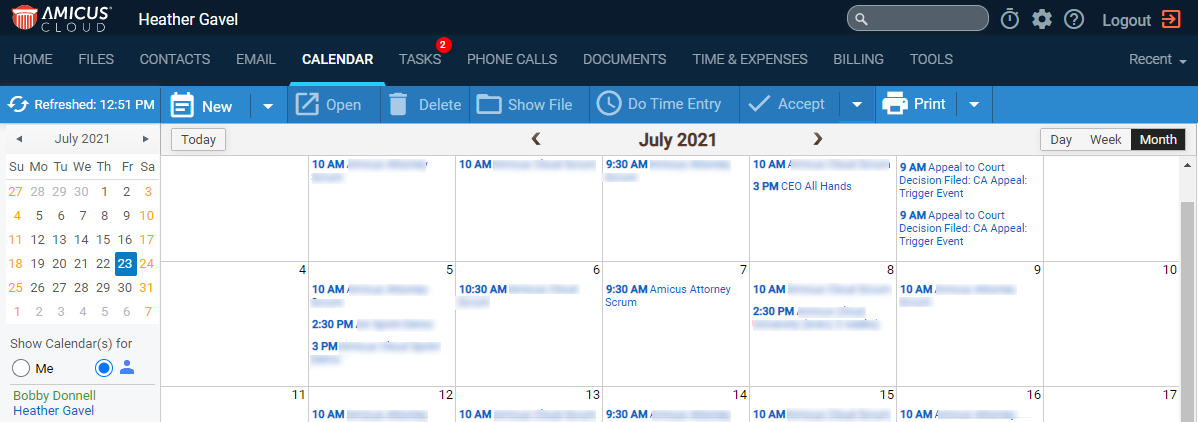
3. Click on
an event to see complete details of the event. The appendage (from Court Rule) displays in the Header and
the name of the Court Rule displays in the Subject
line.
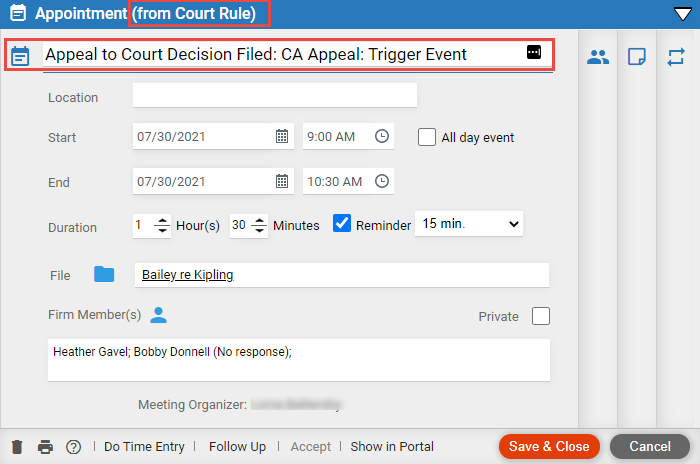
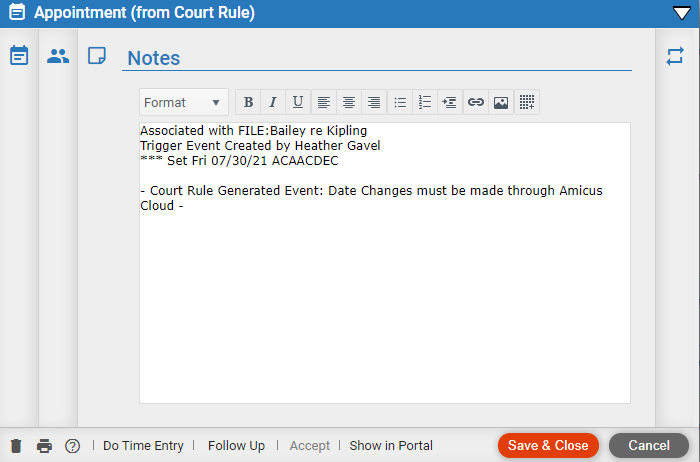
1. Use the controls
or click in a field to enter changes or click on a tab,
for example Notes to edit the Notes.
2. If you attempt to change a deadline on an Event created from a Rule Set a prompt displays.
● If the Task or Appointment
has dependents the following prompt displays:
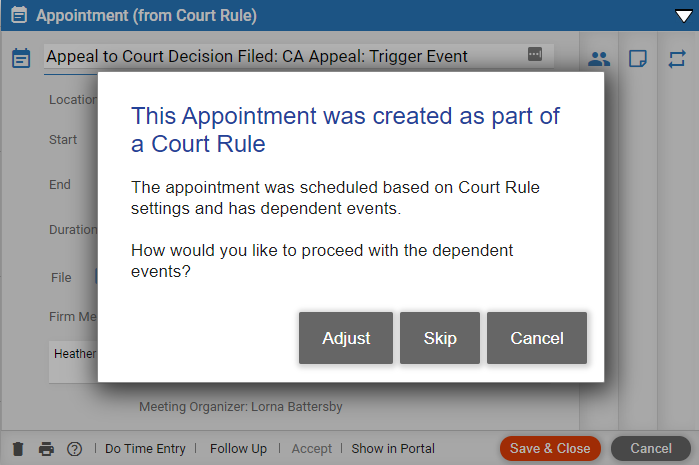
Select one of the following options.
o Click Skip or Cancel to return to the Calendar or Task list without making any changes.
o Click
Adjust to display the Reschedule
Appeal to Court Decision Filed dialog.
o If the
Task or Appointment
does not have dependents the following prompt displays:
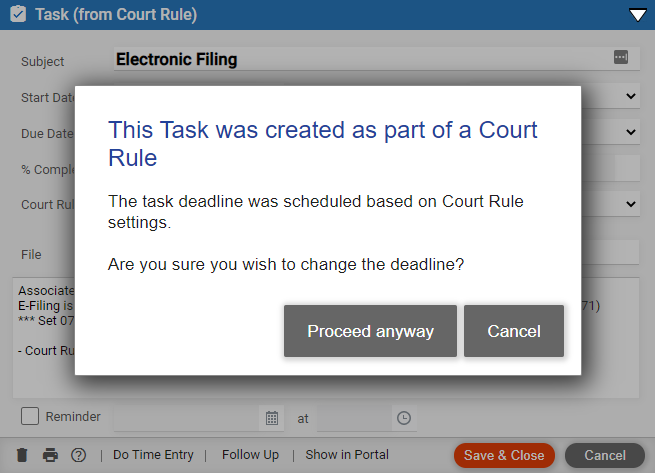
Select one of the following options:
o Click Proceed anyway to change the deadline despite being part of a Court Rule.
o Click
Cancel to return to the Calendar
or Task list without making any changes.
4. Complete
the following fields under Reschedule Event.
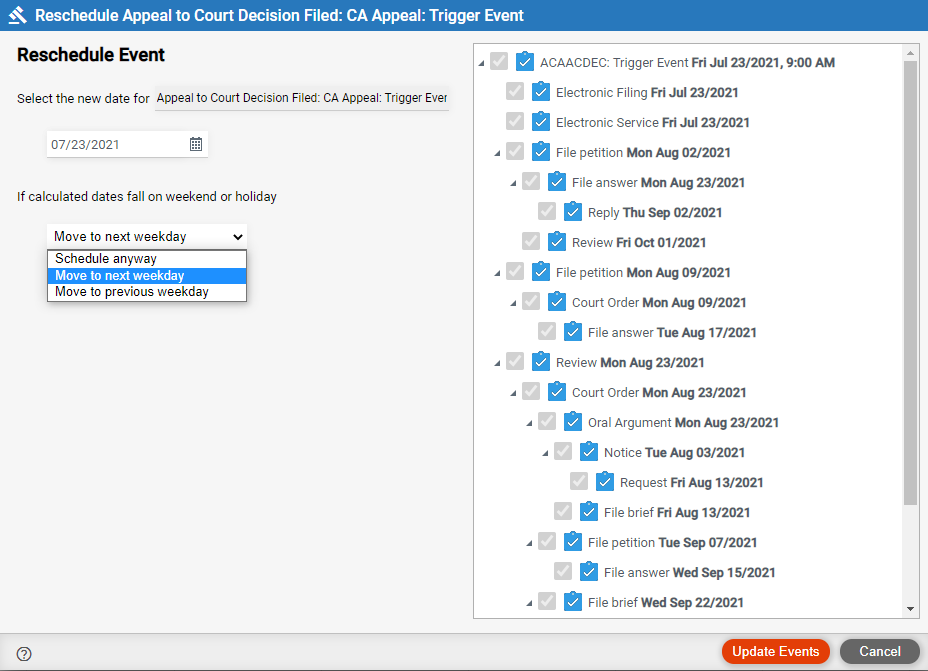
● Use the calendar controls to select the new date for the Court Rule.
● Select an option
from the drop down menu If calculated dates fall
on weekend or holiday. The default is Move
to next weekday.
5. Click Update Events to make the change.
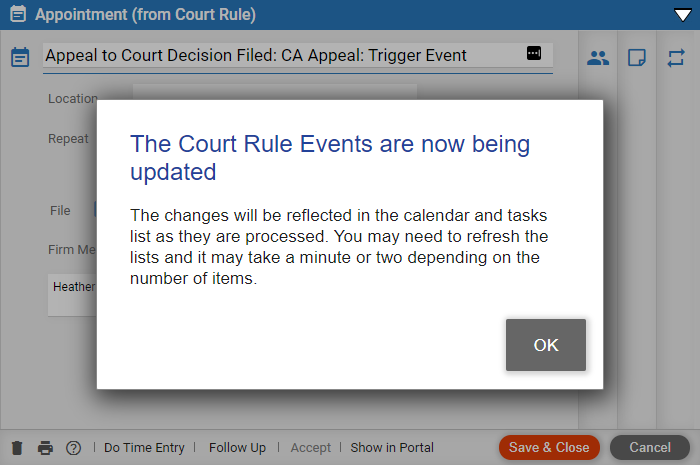
6. Click OK.
The Court Rule Events are updated and reflected in the Calendar/Tasks list.
 |
Note: It may be necessary to refresh your Calendar/Tasks list to see all of the items as they are being created. |
To delete a Court Rule Event created from an Abacus Court Rule (ACR):
1. Select Calendar to see a calendar view or Tasks
from the main menu bar to see a Tasks list.

2. Double-click on an item in the Tasks list or Calendar view to open the details and click the Delete icon.
● If the Task or Appointment
does not have dependent tasks a prompt displays asking Are
you sure you wish to permanently delete this Task / Appointment?
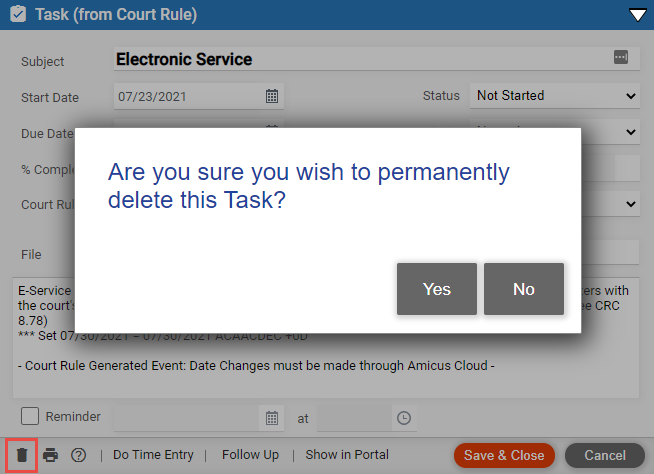
o Click
Yes to permanently delete the event and No to return to the Task
details or Calendar view.
● If the Task or Appointment
has dependent events a prompt displays stating This
Task / Appointment was created as part of a Court Rule.
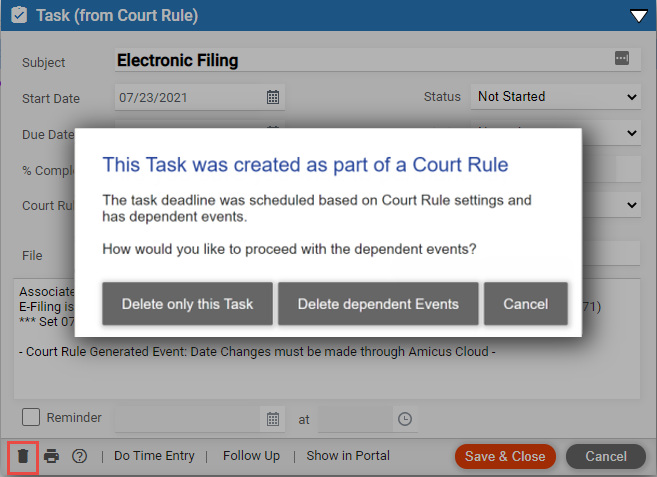
o Click Delete only this Task / Appointment to delete the current event.
o Click Delete dependent Events to delete the dependent events.
o Click Cancel to return to the Task Details or Calendar view.
● View your calendar and rescheduling appointments
● Calendar
Amicus Cloud (July 2023)
Copyright