 and select QuickBooks Link from the left pane,
check Enable Amicus Cloud Integration
with and select the QuickBooks
Desktop version radio button.
and select QuickBooks Link from the left pane,
check Enable Amicus Cloud Integration
with and select the QuickBooks
Desktop version radio button.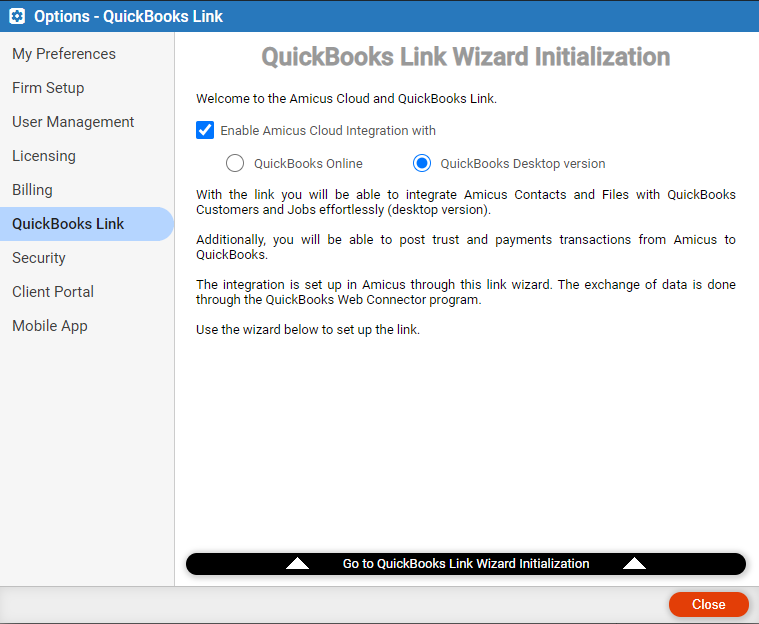
[FOR AMICUS ADMINISTRATOR ONLY]
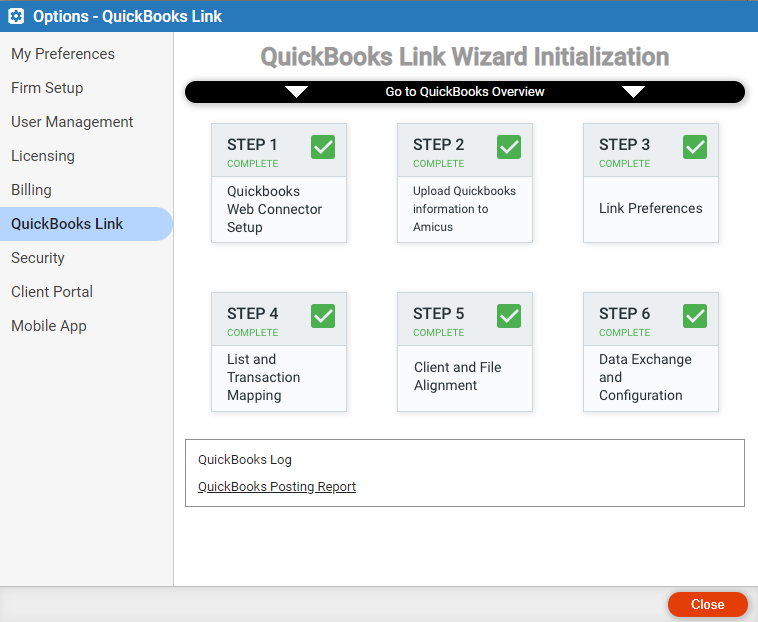
Before using the QuickBooks Link on a day-to-day basis, you must first perform some installation and configuration steps and a first exchange. The Amicus QuickBooks Link Wizard guides you through this process.
● Who and where – As the Amicus administrator, initialize the Link on the computer where the firm's QuickBooks software and database (company file) is installed. (Subsequently, the Link can be run by any user who may open QuickBooks (as a QuickBooks billing supervisor) and run the QuickBooks Web Connector at that computer.)
● Step 1: QuickBooks Web Connector setup
● Step 2: QuickBooks information upload
● Step 4: Lists and transaction mapping
● Step 5: Client and file alignment
● Choose Options and select QuickBooks Link from the left pane,
check Enable Amicus Cloud Integration
with and select the QuickBooks
Desktop version radio button.
● Click the "Go to QuickBooks Link Wizard Initialization" bar.
● Click the step buttons to start, resume, or redo the steps. Complete each of the substeps in each of the 6 main steps.

1. Click
STEP 1 and Download the
QuickBooks Web Connector software.
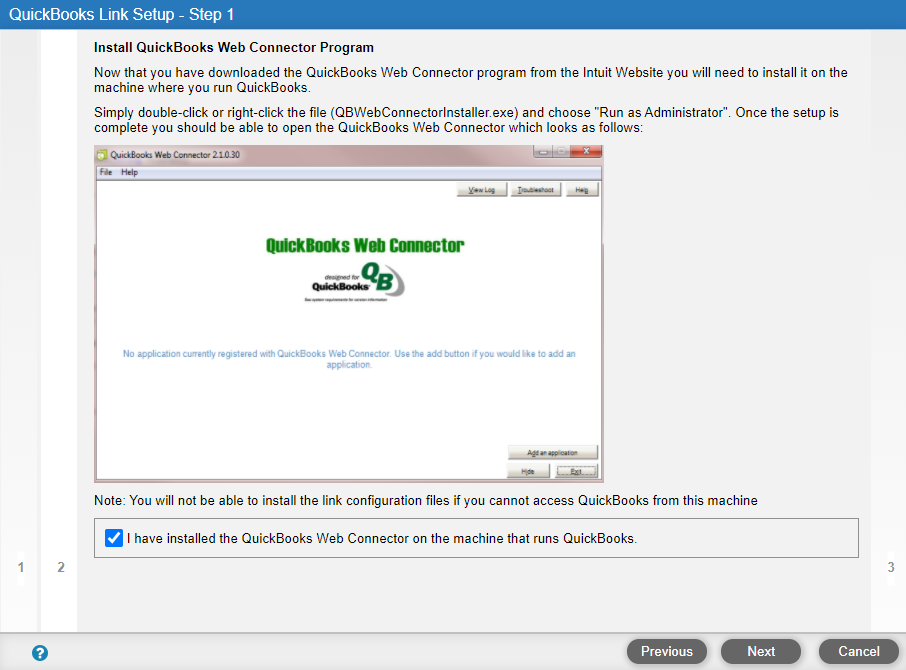
2. Install
the QuickBooks Web Connector.
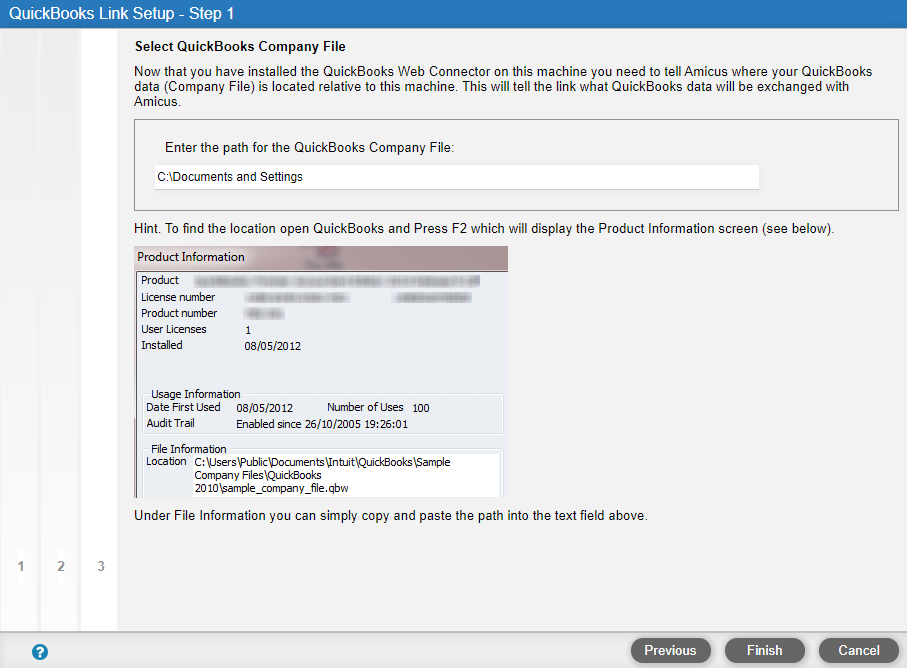
3. Identify the location of your QuickBooks data (company file).
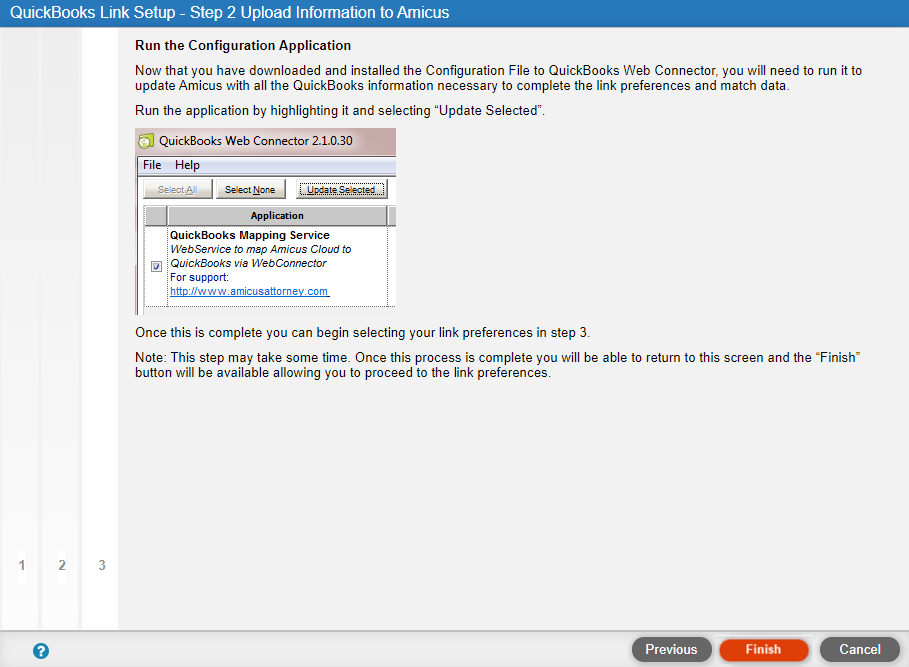
1. Download
the QuickBooks Mapping Configuration file.
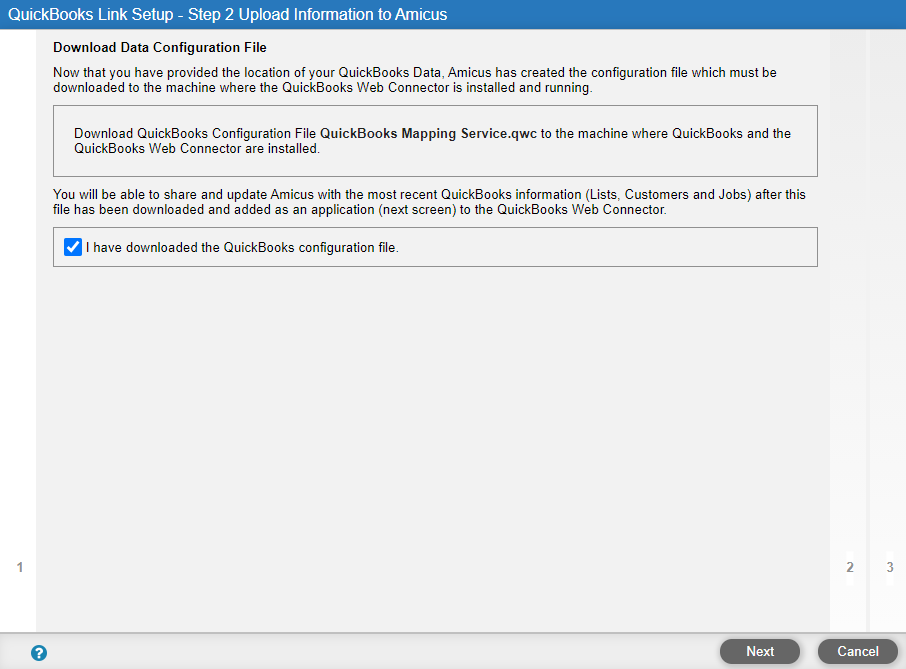
2. Add
the QuickBooks Mapping Service file as an application to the QuickBooks
Web Connector. Enter your Amicus password.

3. Run
the QuickBooks Mapping Service—select its checkbox and click Update Selected.
This uploads to the cloud your QuickBooks data needed to complete the
Wizard, including job types, sales reps, GL accounts, customers, and jobs.
 |
Note: Conflicts are resolved based on the Link priority options set by Amicus Administrator. |
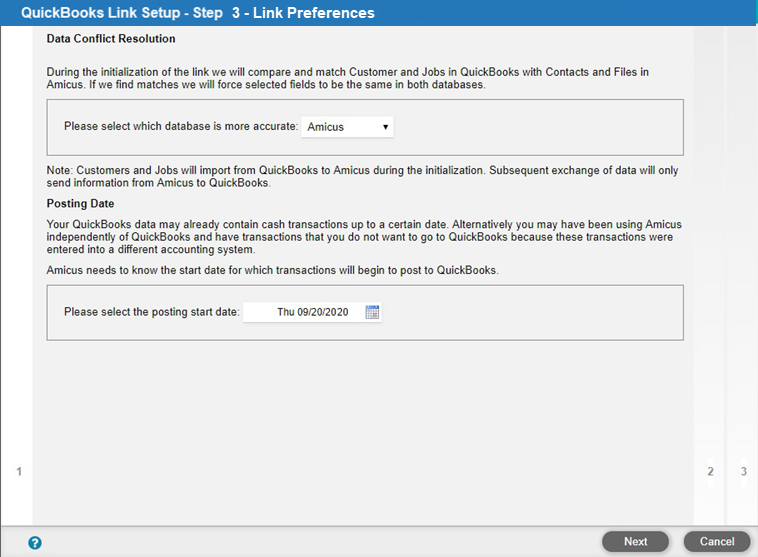
1. Choose whether QuickBooks or Amicus has the more accurate data, to determine which program's record overwrite the other in cases where matching records exist in both programs. This affects initialization but not subsequent exchanges.
o Choose a posting start date for Amicus payment (and optionally trust) transactions to be exchanged to QuickBooks.
2. Choose which set of identifiers will be used to match QuickBooks customers and jobs with Amicus clients and files:
o Client ID/Matter ID — QuickBooks customer name matches Amicus client ID, and QuickBooks job name matches Amicus matter ID.
o QuickBooks ID/File Name — QuickBooks customer
name matches Amicus contact QuickBooks ID field, and QuickBooks job name
matches Amicus file name.
Indicate whether, for customers who are individuals, their name format
in QuickBooks is "First Name Last Name" or "Last Name,
First Name". This affects the automapping of QuickBooks customers
with Amicus contacts, the visual display of Amicus names in Step 5 mapping
lists, and the actual names exchanged from Amicus to QuickBooks.
The QuickBooks ID field is shown in Amicus contact details only if the
corresponding option is selected here.
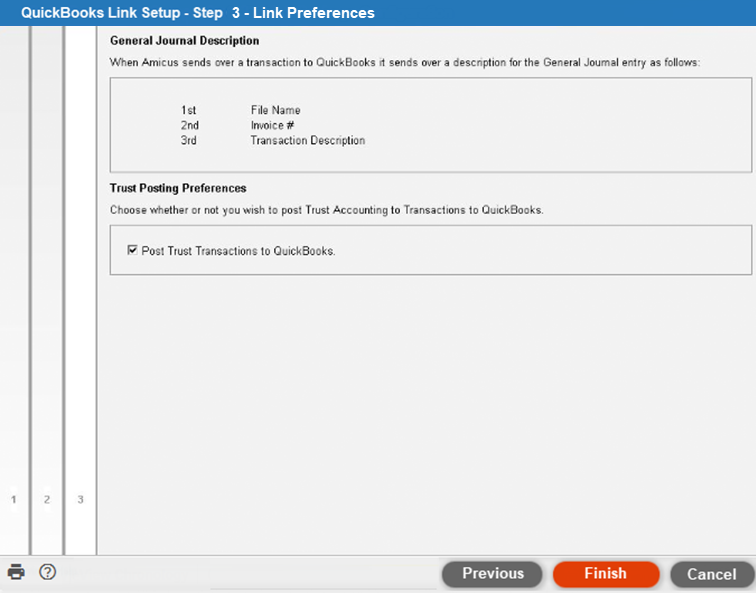
4. Choose whether
to exchange Amicus trust transactions
to QuickBooks.
1. Map
all Amicus file types to QuickBooks job types. To add an unmapped
QuickBooks job type to Amicus as a new file type, select it and click
Add to Amicus.
Any QuickBooks job with an unmapped job type won't be exchanged. Any Amicus
file with a new (unmapped) file type won't be exchanged, and the file
type will be added in red to this screen.
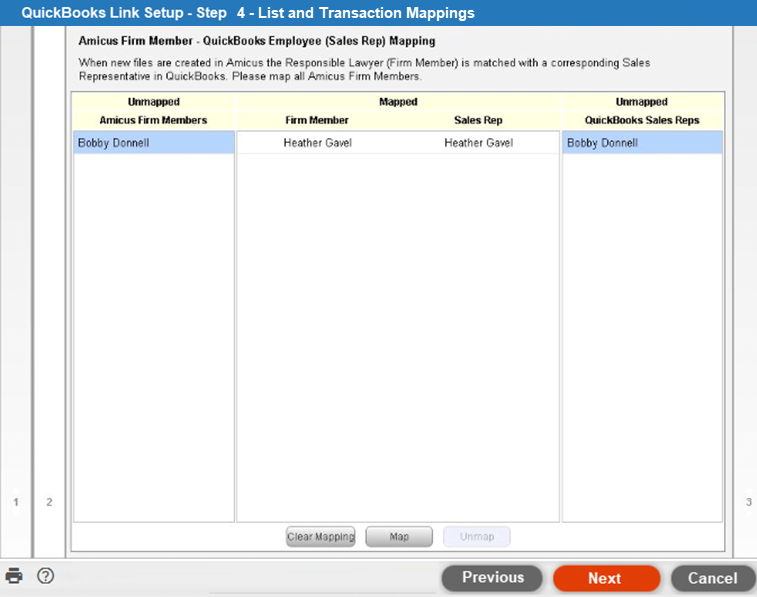
2. Map
all Amicus firm members to QuickBooks sales reps. Manually add
firm members or sales reps in the respective programs first if necessary.
This mapping determines which firm member will be assigned as responsible
lawyer on any files created in Amicus, and which sales rep will be assigned
to the customer on any jobs created in QuickBooks.
Any QuickBooks job with an unmapped sales rep won't be exchanged. Any Amicus
file with a new (unmapped) firm member as responsible lawyer won't be
exchanged, and the firm member will be added in red to this screen.
3. Map
all Amicus accounts to QuickBooks General Ledger accounts. You
can map multiple Amicus accounts to the same QuickBooks account if you
wish.
The three basic Amicus accounts are General Bank, Fee Revenue, and Expense
Revenue. If you've set the Link to exchange trust transactions, then two
Trust Bank categories are listed for each Trust Bank Account defined in
Amicus: a Trust Checks account and a Trust Receipts account. If taxes
are enabled in any Amicus files, then a Tax 1 Liability account (and a
Tax 2 Liability account if necessary) will be listed.

| Amicus Accounts | QuickBooks Accounts (suggested) |
General Bank Account GL |
Undeposited Funds (Asset) account.
TIP: We recommend subsequently depositing funds to the appropriate General Bank account in QuickBooks. |
Fee Revenue Account GL |
Legal Fee Revenue account. |
Expense Revenue Account GL |
Typically, an Expense or Asset account. |
[Trust Bank Accounts] Trust Bank Accounts (as specified in your Options > Billing > Trust Accounts list), and only if you've configured the Link to exchange Trust transactions. For each Trust Bank Account specified in Amicus, two are provided for mapping: a Trust Check account and a Trust Receipt account. |
If you wish to use the Undeposited Funds (Asset) account, you should map Trust Checks and Trust Receipts to different QuickBooks accounts. TIP: If you wish to use a single account for both Trust Checks and Trust Receipts, consider mapping both Amicus accounts to a QuickBooks clearing (exchange) account. This enables a QuickBooks user to print checks and receipts against this clearing account, upon which the funds would be transferred as appropriate. |
Trust Liability Account GL Client Funds in Trust Only shown if you've configured the Link to exchange Trust transactions. |
Client Trust Account
|
Tax 1 Account GL Only if Tax 1 is applied by the firm for one or more non-closed, billable files. |
A clearing (exchange) Liability account. Do NOT map the real QuickBooks Tax Liability account. |
Tax 2 Account GL Only if Tax 2 is applied by the firm for one or more non-closed, billable files. |
A clearing (exchange) Liability account. Do NOT map the real QuickBooks Tax Liability account. |
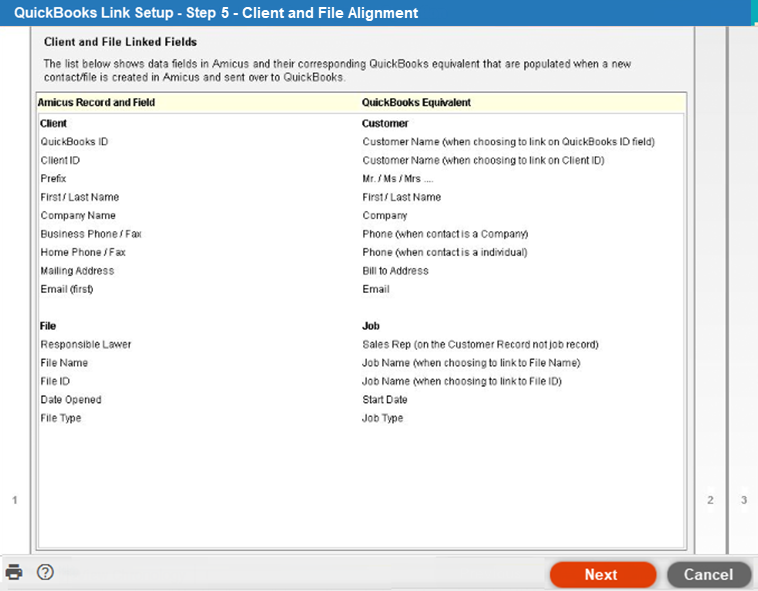
1. Read
which Amicus contact and file fields correspond to which QuickBooks customer
and job fields. For more details, see QuickBooks
Link - What does it exchange?
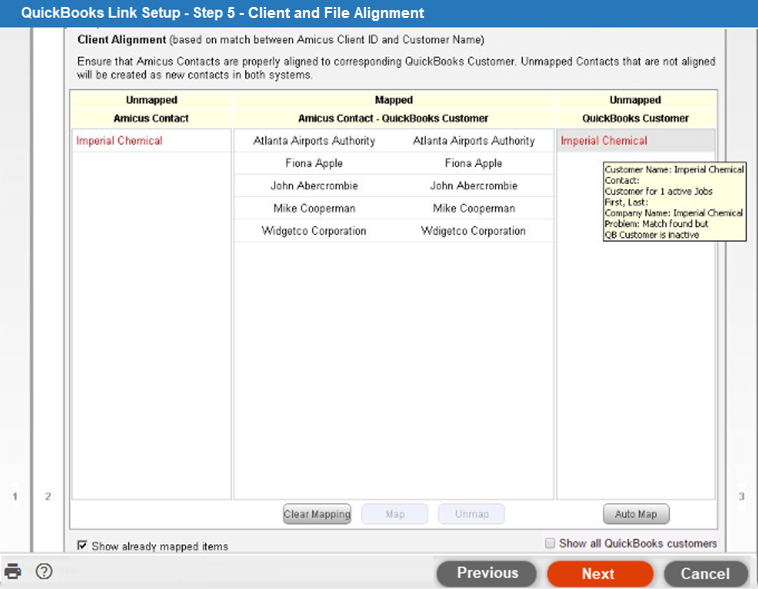
2. Map Amicus contacts to QuickBooks customers. (Or unmap ones that have been improperly mapped.) Items are automatically mapped based on the identifiers you chose earlier (IDs or names).
o Unmapped contacts/customers shown in black in the outer columns are ones that will be added as new items in the other program during initialization (or from Amicus to QuickBooks only during subsequent exchanges.
o Unmapped contacts/customers shown in red in the outer columns are ones that won't be exchanged during initialization (or subsequent exchanges) due to problems that are shown upon mouse over.
o Mapped contacts/customers shown in black in the center column are ones that will be next exchanged. During initialization, either the Amicus records overwrite QuickBooks records or vice versa, depending on which program you said has the most accurate data. (In subsequent exchanges, the Amicus records will overwrite QuickBooks records.)
o Mapped contacts/customers shown
in grey in the center column are ones that have already been exchanged.
● Amicus contacts are listed only if they are primary clients on one or more non-closed, billable files.
● QuickBooks
customers are normally listed only if they are active customers
on one or more active jobs. Customers only on closed, not awarded, or
pending jobs are not listed.
Or select the Show all QuickBooks customers option
to also list (in italics) the active customers who are not on any active
jobs. These customers must have a last name and/or company name. If you
map one to an Amicus contact, initialization will create a job in QuickBooks
from the contact's file in Amicus.
3. Map Amicus files to QuickBooks jobs. (Or unmap ones that have been improperly mapped.) Items are automatically mapped based on the identifiers you chose earlier (IDs or names).
o Unmapped files/jobs shown in black
in the outer columns are ones that will be added as new items in the other
program during initialization (or from Amicus to QuickBooks only during
the next subsequent exchange).
o Unmapped files/jobs shown in red
in the outer columns are ones that won't be exchanged during initialization
(or subsequent exchanges) due to problems that are shown upon mouse over.
o Mapped files/jobs shown in black
in the center column are ones that will be next exchanged. During initialization,
either the Amicus records overwrite QuickBooks records or vice versa,
depending on which program you said has the most accurate data. (In subsequent
exchanges, the Amicus records will overwrite QuickBooks records.)
o Mapped files/jobs shown in grey
in the center column are ones that have already been exchanged. (These
appear only after initialization.)
o WE RECOMMEND YOU CLEAN UP THE RED ITEMS - change
in Amicus then return to this screen, and/or change in QB then run 1st
service again then return to this screen to confirm now mapped or black?
● Amicus files are listed only if they are non-closed files with a primary client assigned.
● QuickBooks jobs are listed only if they are active jobs with an active customer assigned.
1. Download
the QuickBooks Exchange Configuration file.
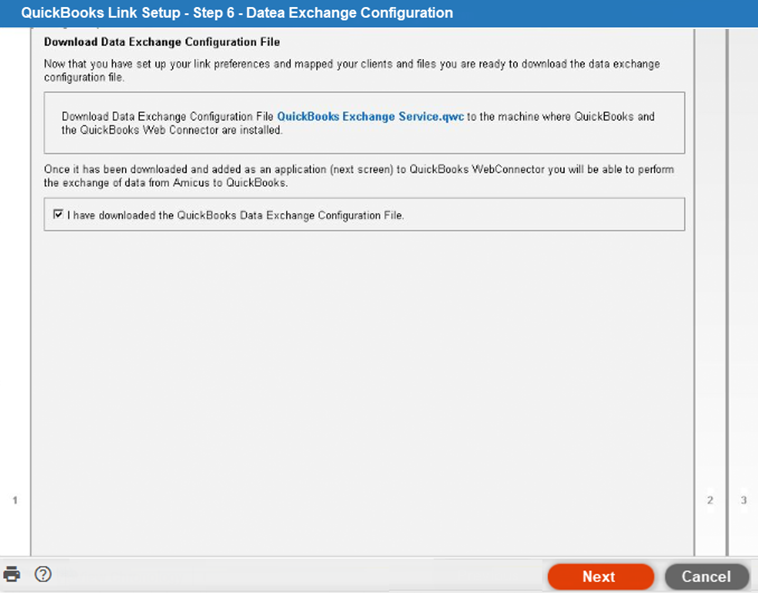
2. Add
the QuickBooks Exchange Service file as an application to the QuickBooks
Web Connector. Enter your Amicus password.
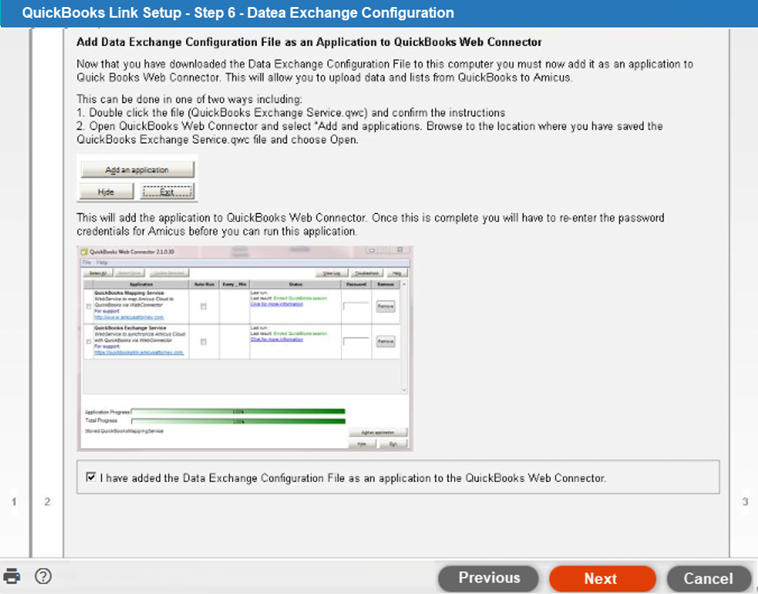
3. Run the QuickBooks Exchange Service. (Select its checkbox and click Update Selected.) This performs the first exchange, completing the initialization process:
o Mapped clients/customers and files/jobs are updated in Amicus/QuickBooks and linked.
4. Unmapped
clients/customers and files/jobs without problems are added to Amicus/QuickBooks
and linked.
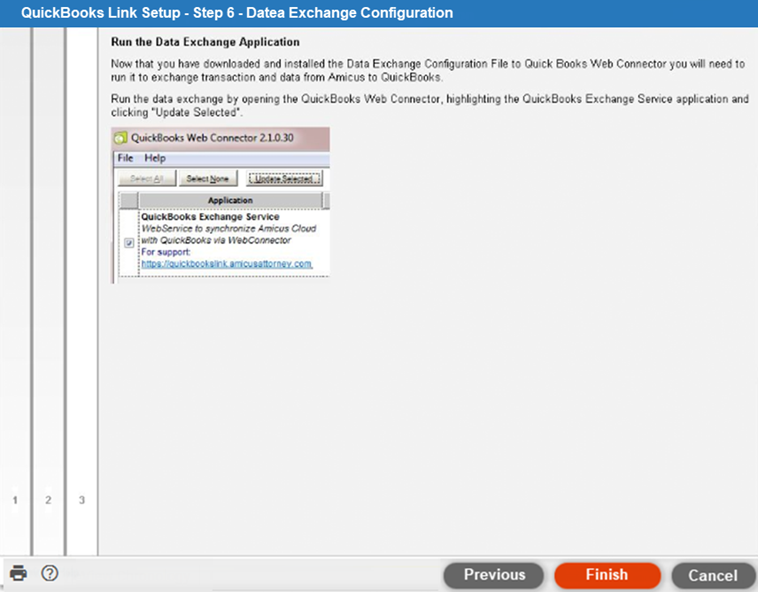
5. Consult the
QuickBooks Posting Report, available from the
first page of the QuickBooks Link wizard.
● QuickBooks Desktop Link - What is it?
● QuickBooks Desktop Link - How to use it
● QuickBooks Desktop Link - What does it exchange?
Amicus Cloud (July 2023)
Copyright