 to display
the Options - My Preferences window.
Select Firm Setup from the navigation
pane, and click File Types under the Files
section.

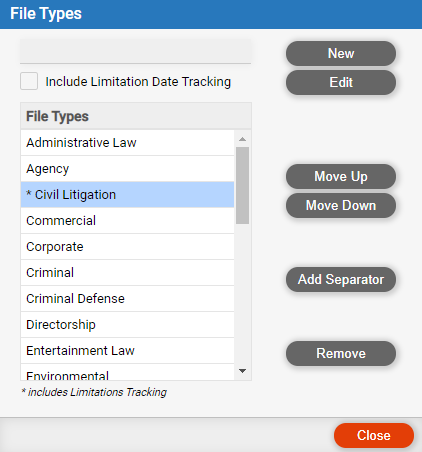
● Customize file types for the firm
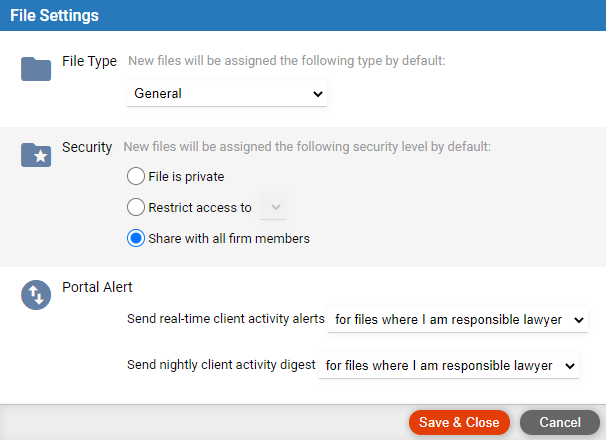
● Set a default file type and security for your new files
● Customize contact file roles for the firm
● Client and matter ID rules for the firm
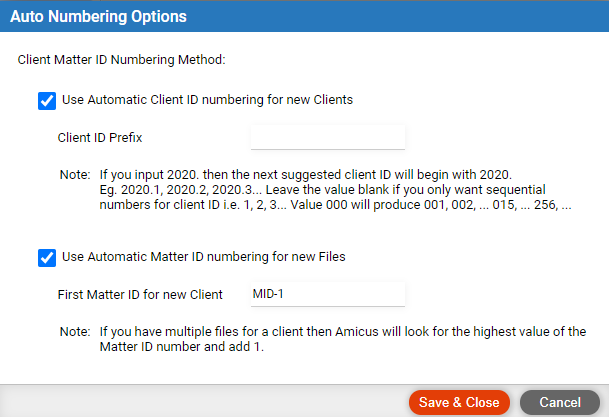
● Set client ID and/or matter ID auto-numbering for the firm
● Enable/disable file security for the firm
● Customize user groups and set your membership
● Customize taxes, invoices, and bank accounts
● Designing custom fields for a file type
● Choose Options  to display
the Options - My Preferences window.
Select Firm Setup from the navigation
pane, and click File Types under the Files
section.


● Change
the list as desired: Add, remove, rename, or move file types in
the list.
When adding or editing a file type, indicate whether it supports limitation
date tracking.
● Choose Options to display
the Options - My Preferences window,
and click My File Settings under
the Files section.


● File type and security: Assigned by default to new files you create from now on. Changing this setting does not affect existing files. If file security is not enabled for your firm, the default security option is not available.
● Choose Options  to display
the Options - My Preferences window.
Select Firm Setup from the navigation
pane, and click Roles under the Files
section.

● Change the list as desired: Add, remove, rename, or move file roles in the list.
● Client ID and matter ID requirement: A client ID and matter ID might be required in all files, depending on which accounting system the firm exports posted time entries to, and optionally if the firm uses the QuickBooks Link with Amicus Billing. Otherwise, use of these IDs is optional. See How to enable time entry/expense posting for the firm or QuickBooks Link Step 3: Link preferences.
● Client and matter ID uniqueness: Client ID must be unique across clients for the firm. Matter ID must be unique across the files for the same primary client.
[FOR AMICUS ADMINISTRATOR ONLY]
● Choose Options  , select Firm Setup from the navigation
pane, click Auto Numbering under Files.


● Client ID auto-numbering: If enabled, optionally enter a client ID prefix. Whenever a contact who doesn't already have an ID is assigned as primary client on a file:
o If prefix is left blank, the default client IDs provided will be 1, 2, 3, ..., 9, 10, 11, etc.
o If prefix doesn't end with digits, e.g. "2015.", the default client IDs provided will be 2015.1, 2015.2, 2015.3, ... 2015.9, 2015.10, 2015.11, etc.
o If prefix ends with digits, e.g. "0000", the default client IDs provided will be 0001, 0002, 0003, ... 0009, 0010, 0011, ... 0099, 0100, 0101, etc.
If you later change the prefix, client ID numbering will
start over at 1.
If the ID that would normally be provided has already been assigned (e.g.
0023), the number following the highest number assigned will be provided
instead (e.g. 0031). This might occur if users have manually assigned
IDs.
● Matter ID auto-numbering: If enabled, optionally enter the matter ID to be used in the first file assigned to a client. Whenever a contact is assigned as primary client on a file:
o If this number is left blank, the default matter IDs provided will be 1, 2, 3, ..., 9, 10, 11, etc. for that contact.
o If this number doesn't end with digits, e.g. "2015-", the default matter IDs provided will be 2015-1, 2015-2, 2015-3, ... 2015-9, 2015-10, 2015-11, etc. for that contact.
o If this number ends with digits, e.g. "001", the default matter IDs provided will be 001, 002, 003, ... 009, 010, 011, ... etc. for that contact.
● If you later
change this number, matter ID numbering will resume where specified. For
example, if you change from "001" to "051", the next
default matter ID for a client will be 051.
If the ID that would normally be provided has already been assigned (e.g.
023), the number following the highest number assigned will be provided
instead (e.g. 031). This might occur if users have manually assigned IDs.
Default matter IDs are provided only for files that have a primary client.
[FOR AMICUS ADMINISTRATOR ONLY]
● Choose Options  to display
the Options - My Preferences window.
Select Firm Setup from the navigation
pane, and click Security under the Files
section.

Or, from the Details > Access view
of any file, click Enable File Security Restrictions for the firm.

● Choose to make all files accessible to all firm members. This disables the file security feature, simplifying Amicus and improving performance. It is the default.
● Enable file security if you want firm members to be able to limit access to a file to only themselves (private file), or to only the members of a particular user group, or to all users.
● You may disable file security only if no files are currently private or limited to a user group.
See Customize billing features.
Create fields that will appear in the Custom view for all files of the same type. See Design custom fields for a file type.
● Billing
Amicus Cloud (July 2023)
Copyright